In a bowl, combine the sugar and lukewarm water then sprinkle yeast over the water. Once the yeast has started to froth add the oil.
Place the oil water mixture in a mixing bowl and gradually add flour. Knead to create a smooth elastic dough. This can be done by hand or kitchen mixer.
If using a kitchen mixer, start with the standard mixer attachment initially and when the dough gets stiffer after about 3 cups of flour switch to dough attachment. Continue to add flour until you see the dough pull away from the sides. Generally to achieve this it takes a little practice and alternating between adding flour and oil to get the right consistency. To get the best dough, it takes practice to get a feel of what the dough should look and feel like. It should feel a smooth soft elastic dough that bounces back slightly when touched
Place the dough ball in an oiled bowl then drizzle a little oil on the surface of the dough. Cover with a clean tea towel and let stand in a warm place until doubled. This generally takes a couple hours.
When the dough has doubled, punch it down sprinkle with salt and gently knead. Cut the dough into small portions and roll out in pita sized circles on baking paper to about 2-3 mm thick. Leave it stand for for 10 mins.
In the meanwhile heat the oven to 200 C with a baking sheet inside. This is a key step, you need a very hot oven and baking sheet to get the dough to puff up.
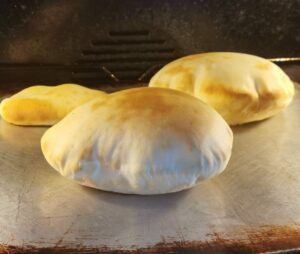
When the dough has risen slightly, gently peel the dough off the baking paper and place on hot baking sheet. Bake for 2-3 minutes or until slightly golden. Watch them, they can burn quickly
The dough should puff up in the oven, though I never have 100% success! By puffing up the pocket is created in the pita bread. To remove air, poke with a sharp knife to let steam out and remove from the oven. Stack the cooked pita on top of each other to cool.
Enjoy! Don’t get discouraged if it doesn’t always puff up, just keep trying. Seeing one work makes it all worth it and practice makes perfect or in this case a pita bread!